Showing posts with label vintage trailer. Show all posts

Wednesday, June 1, 2016

Veneer backing in curves?

Anyone have a good recommendation for a thin backing material for the base of my booth/dinette/couch/sleeper?  I'm putting a "U" shaped booth in the front of my 67 Streamline Duchess.  I've framed in some three curved radius along the base.  My plan was to use 1/8" door skin material and then use a real quarter sawn oak veneer.  The doorskin can handle the radius (~ 6") and I'm looking for alternatives that will be a good backing for my thin veneer material.  Recommendations?  Ideas?

Here you can see the basic shape outlined in masking tape. 


 This is a drawing with measurements of what I've framed.  Pics of framing below.
This shows the beginning of the frame and the black metal table legs.  This is a cool design that swings down to sleeper height.  It also is mobile and can go outside.


Here you can see the finished frame with 3 radius corners.  Still trying to figure out the best way to support the table top.  I've thought 1x2" oak in the straight aways but then am not sure what to do in the curves.  Ideas?
Working on where to put the seams in the plywood & cushions.  I want them to line up so its easier to access under seat storage.  Thinking I'll permanently mount seat plywood in the corners and then leave the three other sections as access. 

 In this section, I'm thinking one big piece of plywood/cushion.  Not planning to put in a hinge, just a small lip to keep plywood in place and then velcro the cushion.  

One last overall look at this phase.


Saturday, March 5, 2016

Sink & faucet...

Starting on the funnest part!  Starting to pick out the finishing touches.  This cool sink from Ikea has a  built in drain pan and several components like dish drying racks, cutting board and colander.  I also like that I can set a hot pan on it if I go with wood or other temperature sensitive countertop material.  Currently thinking butcher block maple from lumber liquidators but I might still go with formica or solid surface if I can find product I like better.

 This is a cool Ikea faucet.  I like that it's small, has single handle operation and an integrated spray head.  


Friday, February 5, 2016

Buttoning up inside & framing furniture

Reattaching ceiling panel
 I've done most of this work by myself, and that makes for some creative solutions to act as extra hands.  In this case, I built a wood frame just below the ceiling so that I could support the center ceiling aluminum without having it fall and have its own weight cause a crease.  It worked great.
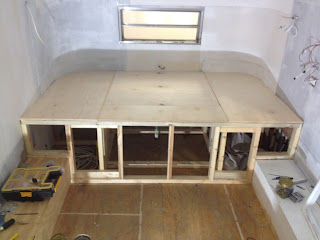
Bed frame

 Above is a picture of the bed frame.  Trying to accomplish a bunch of objectives here.  First, this trailer has a tailgate with rear storage, so the bed frame had to be above that...giving it a height of 24".  I also wanted an oversized water tank because I'm not worried about weight (tow vehicle has a Hemi) and it just seem luxurious.  So, the center compartment is huge to accommodate a 60 gallon fresh water tank.  Other concerns were that this is built over my two waste water tanks, so I had to be careful where and how to attach this frame to the 5/8" floor.  The sheet of plywood you see on the right side looks out of place in this pic, but it's the end panel for my kitchen cabinet.

This picture shows one of the big problems I had to solve.  This corner had a fiberglass shower stall that broke when I removed it.  I had no idea how hard it would be to cover this area with aluminum.  The white triangle piece is fiberglass cut from the shower and all of the silver strips are a trial and error effort that finally paid off with the help of a fishing buddy. 

Here is the bed with the plywood cover.  I used high grade 1/2" maple from Lowes.  Its about $42 per sheet.  I could probably get away with a lower grade 3/8" product but I'm not taking any shortcuts.  I cut the back corners first.  Process is to get a piece that is oversized and about the right shape, then I made a scribe (1/2" x 1/2" x 18" square & pointed stick with a hole drilled in it for a pencil to poke through).  I drilled several pencil holes in my scribe tool and basically just cut and re-cut until I could match the irregular shape of the walls.  For me, being patient and taking my time paid off & every joint is within 1/8" of perfect.

Back to the outside to add a gravity water fill spout.  This barely fit under the gold trim, under the top of the bed on the inside, and still had enough fall to the top of my 60 gallon fresh water tank under the bed.   Guess I can't always be unlucky:)

 Here's another first for me.  Decided to go with curved radius corners on my booth.  You can see in the back that I cut a big half circle out of 3/4" plywood and then cut the circle in half to make two 1/4 circles.  Then I put lots of studs for surface area to attach the skin material later.  I'm using HD screws for everything.
 
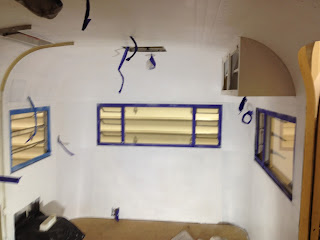
Hard to explain how great it was to paint the inside.  Not the first coat though.  I ordered razzou zolotone textured paint and bought a special sprayer to apply it, and could not have been more disappointed.  One application my ass.  Anyway, it was a disaster.  I tried putting it on thick enough so that it would cover the primer and then it dripped and I had to wipe it off...  My recommendation is to pass on zolotone.  It did help to soften some texture changes but wasn't worth the $200 - especially since I had to paint two layers of primer and 4 layers of latex over it anyway.  Primer and good latex is hard to beat.

 This shot shows paint in the other direction and the 60 gallon fresh water tank.  Hope the framing is strong enough to hold the 500lbs of water sloshing around...?  I'll come back and make it stronger later.

Installed these tall panels to go define fridge/convection oven space and also added a back and end to kitchen cabinets.

 Here you can see the table and beginnings of my radius booth.  The table has a latch that swings the top down to bed height and also allows it to go outside for use.  My buddy has a table like this in his RPod and I love it.

Tuesday, January 5, 2016

Buttoning up the exterior

It's been a long time since I posted any progress.  I lost my shop space, so I took some time off for awhile and then got around to working on it again but not posting updates.  Here is the start to a series that will catch things up.

I added this period porch light.  It's the spartan art deco model available at Vintage trailer supply and other retailers.  The one that came with this project was a hideous square thing with rotten plastic cover.  I like this improvement.


 Here is the reattachment of the original gold anodized trim.  After all of the work re-manufacturing the frame and floor - I was completely shocked at how well the holes lined up.  I don't remember a single hole being off by more than 1/16" !!!
This is a picture of my new water heater install.  This one didn't fit the old hole, so that is a new piece with original drip molding.  Now that I look at it, I probably should have moved the drip down closer to better protect the heater....
Installed a new license plate holder that is very close to the original.

 Square Patch over the old furnace exhaust hole.

Tuesday, May 26, 2015

Cast your votes!

Interested in this project?  Want to help determine how it turns out?  I've added three poll questions to ask folks following the blog what equipment and material choices they'd like to see used.

1) Which fresh/cold air system?

2) Which wet bath concept should I use?

3) Which furnace should I use?

In order to vote, view the blog on a computer screen and see the options in the left column.  For some reason, it doesn't work on the mobile site.

Wednesday, May 20, 2015

Reattaching the shell


 Finally have the shell back on the chassis.

In this picture, you can see that I've removed the sawhorses and have begun lowering the shell back onto the chassis/floor.
As with lifting it, I use a bottle jack to support half the shell, put some short legs on the wood frame and lower it down to the new level.


The 'C' channel and brackets attaching it to the studs were in bad shape.  In this picture, I'm fabricating new L brackets to make the attachment. Easier to drill holes in the large material before I cut it.  


  Cutting the new brackets.

Piling up the new brackets.


Reattachment is tricky.  This Streamline trailer had belly pan wrapped and crimped on the 'C' channel.  I'm faced with the challenge of trying to figure out how to make sure my wood floor has the right radius corners (old ones were so rotten I had to guess), attach bellypan, attach shell, attach floor, and sprayfoam the underfloor.  In this picture, you can see that I've crimped one section of bellypan so that I can lower the shell over it.
 Removed most of the external wood framing.  These back two legs are allowing me to use floor jacks to adjust the shell for final touchdown.


 Instead of rebuilding the curved corners, I'll keep them and wrap as much new material over them as I can.
 This extra sheet of new is to guide the lip of the shell over the new bellypan lip.
 All of the external wood is gone and starting to lower the back.

 Installed the rear 'C' channel and lowered the shell.
 All of the interior wood framing is gone and starting to make solid attachments all around.


Saturday, April 11, 2015

Craigslist Find

Found this rare beauty on craigslist.  It's a 1967 Streamline Duchess travel trailer.  Hope to redo the mechanicals and furniture to make a nice getaway for our family of 4.